
![]()
You trust Salesforce to manage your pipeline. So why are your emails landing in spam?
- Your subject lines aren’t clickbait
- You didn’t write anything sketchy
- You didn’t add 20-some links in your content
But your carefully crafted messages keep getting dumped into spam folders.
Some Salesforce campaign emails might look suspicious to email providers due to their promotional nature. Without a proper technical setup, your outreach triggers the same spam filters designed to catch scammers. And the worst part is that you might not know for weeks.
As an email deliverability expert who’s helped thousands of businesses go from spam box to inbox over the past decade, I’m here to peel back the curtain on:
- How to build real email credibility
- Ways to bulletproof your CRM campaigns
- Simple steps to repair your sender’s reputation
Now, you could try figuring all this out yourself — or, if you’re a business, just schedule a free call with a deliverability consultant and let an expert from Maxify take care of it.
Our Maxify Inbox offers:
- Unlimited deliverability consultations
- Unlimited email warmup
- Dedicated IP address
- Email validation
We can set everything up for you right away. Want to know how?
Schedule your consultation call
A quick skim (TLDR)
If you don’t have the time to scan through the entire article, here’s the gist of it:
| Fix | What to do |
| Set up email relay | Enable SMTP relay via Salesforce Setup, configure domain filters, and send from your mail server |
| Set up SPF & DKIM authentication | Add SPF records, create DKIM keys in Salesforce, and publish them via DNS |
| Refresh the domain & warm up the email | Monitor sender score via Google Postmaster, and gradually increase email volume with Email Warmup |
| Avoid spam triggers in content | Avoid buzzwords, ALL CAPS, and excess images, and test every campaign with a spam checker |
| Use a consistent sending schedule | Send emails during business hours, warm up gradually, and set recipient expectations |
| Make emails mobile-friendly | Use responsive design, short subject lines, tap-friendly buttons, and test on real devices |
| Reduce the size and number of attachments | Use cloud storage links, compress images, and keep total email size <100KB |
| Maintain a clean IP address | Check blacklist status with MXToolbox, clean list with Email Validation API, warm up new IPs |
| Configure Salesforce deliverability settings | Turn on Bounce Mgmt, enable TLS, set “All Email” access, and add authentication headers |
Tip 1: Set up an email relay
Salesforce doesn’t play nice with spam filters by default. When you send emails through Salesforce, they come from Salesforce’s servers (not yours).
Email providers notice this and become suspicious, as they think someone might be pretending to be you.
")
An email relay fixes this problem by letting you send Salesforce emails through your own mail server instead. This makes it look like the email came directly from you, not a third party. That way, Gmail or Outlook is far less likely to hit the spam button.
- Without relay: Shows “via salesforce.com”
- With relay: Shows “from john@yourcompany.com”
Gmail and Outlook trust emails from your own domain, not from third-party senders. With a relay:
- Security checks pass cleanly
- Your “From” address actually matches your domain
- Your reputation improves with every message sent
How to enable email relay in Salesforce (step-by-step)
Here’s how you can enable email relay:
1. Request activation
Open a support case with Salesforce and ask them to enable email relay for your org. Provide your Org ID and the phrase “Allow Email Relay Enablement.”
2. Check relay Status
In Setup, search “Email Relay” to confirm activation.
3. Configure the relay
- Enable SMTP Auth
- Add your server Host
- Input your Port, TLS, Username & Password
- Save settings
4. Set domain filters
Go to Email Domain Filters, and whitelist your sender and recipient domains.
Tip 2: Setting up authentication protocols (SPF & DKIM) in Salesforce
You can’t enter a high-security building without showing ID. That’s exactly what your emails do when you don’t set up SPF and DKIM (two fundamental email authentication protocols).
- SPF (Sender Policy Framework) tells email providers which servers can send emails for your domain. It’s like a guest list for your email.
- DKIM (DomainKeys Identified Mail) adds a digital signature to prove your emails are authentic and unchanged.
Without these, your emails trigger spam filters immediately.
Salesforce lets you integrate these easily, but you have to manually configure them in your DNS settings.
To do it right:
- Add Salesforce’s IPs to your SPF record
- Generate and publish a DKIM key in your domain’s DNS
- Go into Salesforce Setup > DKIM Keys, generate, then publish and activate
Once done, email providers will recognize you as a trusted sender. If you skip this step and your emails will keep getting blocked (no exceptions).
In addition to setting up SPF and DKIM, Maxify Inbox helps validate your email list by removing invalid addresses and replacing them with valid ones, thereby improving your domain reputation and deliverability.
Tip 3: Refresh your domain for priority inbox treatment
Think of your domain as your brand reputation; once it is tarnished, it can hurt your business potential. A past spam issue can affect the success of your future emails indefinitely. Two things you can do are:
Track your sender score
It’s like your inbox credit score. Tools like Google Postmaster Tools give you insight into how your email campaigns are performing.
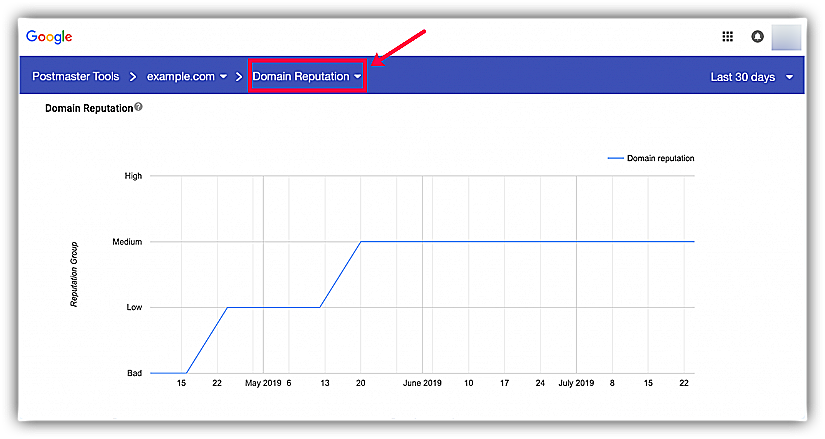
A score above 80 is good, but anything below 70 means you’re on thin ice. So if your score’s tanking, it’s time to audit your list, content, and send practices. You can check your score right from your inbox for free using this email spam checker.
You can use Maxify Inbox to access unlimited deliverability consultations, helping you track your sender score and ensure that your emails consistently land in the inbox.
Warm up your email
To build up the connection between your domain and your customer’s inbox, you should gradually increase the volume of emails you send.
Use Email Warmup to gradually introduce your account to email providers, simulating natural engagement patterns such as clicks, replies, and opens.
This process helps build trust with major email providers, ensuring your emails land in the inbox rather than the spam folder.
After 2-4 weeks of warmup, you’ll see significant improvements in deliverability.
Tip 4: Avoid spam triggers while writing your content
A perfect tech setup won’t save you from bad writing.
Even with flawless authentication, your email content can still trigger spam filters. One wrong word and your message disappears.
Here’s how to write emails that actually reach people.
Skip the spammy language.
Certain words make spam filters panic. They’re tied to scams and phishing attempts.
Never use these phrases:
- “Act now.”
- “Risk-free”
- “Winner”
- “Earn $$$”
- “Make money fast”
One spammy phrase in your subject line can doom the entire email because spam filters spot desperation instantly.
Before sending your email campaigns, use our email spam checker to ensure your content isn’t triggering spam filters.
No yelling, no hype
Writing in ALL CAPS kills your deliverability, and so does excessive punctuation and over-the-top language. For example:
- Bad: “GET YOUR FREE BONUS NOW!!!”
- Better: “Claim your bonus (no strings attached)”
Spam filters link all-caps and symbols to scams. You’ve got to understand that you’re trying to build trust, not selling on a street corner.
Balance images and text.
Image-only emails get flagged as spam, and so do emails packed with flashy visuals. There’s that sweet spot or perfect balance between text and image, and you’ve got to crack it before blasting out your emails.

Follow these rules to find that optimal proportion:
- Always add alt text to images
- Use a 60:40 text-to-image ratio
- Skip background images and hidden links
Filters watch for image-heavy messages. So no matter how much “aesthetically pleasing” they might look, don’t let design choices sink your emails.
Test before you send
You don’t do anything without testing in marketing, especially emails. Thanks to sophisticated technology now available, you can easily use an email spam checker to:
- Review your subject line
- Find spammy phrases or formatting
- Check your overall spam score
It takes seconds and can save your entire campaign.
Make both opting in & unsubscribing simple.
If you don’t leave a clear address, nobody will show up for the party. And If you box people into something without showing them an easy way out beforehand, that’s still classified as holding them in captivity.
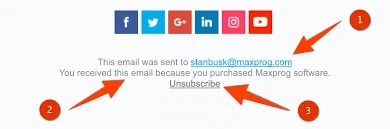
Hard-to-find unsubscribe links backfire, and people will mark you as spam instead. And it won’t take 200 people to tank your domain. A single-digit number is powerful enough to put you down. Therefore, you must:
- Include a visible unsubscribe link
- Don’t require a login to leave your list
- Use clear language like “Click here to unsubscribe.”
Write with clarity and respect, and your emails will stay in the inbox to earn the clicks you want.
Tip 5: Have a consistent email delivery schedule
Your email timing matters more than you think. Here’s how to create a send schedule that keeps you under the radar (in a good way).
Don’t send in spikes.
Going from zero to 10,000 emails overnight is considered “bot behavior” to spam filters. Therefore, you must start small and build up gradually.
Even if you’ve sent emails before, use a warmup strategy over 2-3 weeks. Here’s how:
- Week 1: 50 emails per day
- Week 2: 100 emails per day
- Week 3: 250 emails per day
- Then scale up slowly
Send at normal business hours
Sending emails at 2 AM on Sunday looks suspicious, and so does dumping thousands of messages during lunch on Monday. Stick to when people actually check email:
- Tuesday through Thursday mornings
- Between 9 AM and 11 AM local time
- Or 1 PM to 3 PM for follow-ups
Weird timing suggests you’re a spammer or using sketchy automation.
Set clear expectations
Your subscribers expect a weekly newsletter, but you suddenly send 5 emails in 3 days. Not only would your message be ignored, but you’ll get unsubscribes and spam complaints.
Tell people upfront what to expect:
- Weekly newsletters
- Monthly campaigns
- Trigger emails only when relevant
Predictable sending builds trust, and trust eventually builds engagement.
Use smart automation
Automation tools help, but a poor setup can flood inboxes at odd hours or send duplicate messages. Therefore, you must always check:
- Volume limits
- Time zone settings
- Trigger configurations (are they firing twice?)
Don’t let bad tech settings get you flagged as spam.
Also, as you gradually scale up your email volume, ensure your list is clean and accurate. Use our email validation API to verify email addresses before sending.
Tip 6: Make your emails mobile-friendly
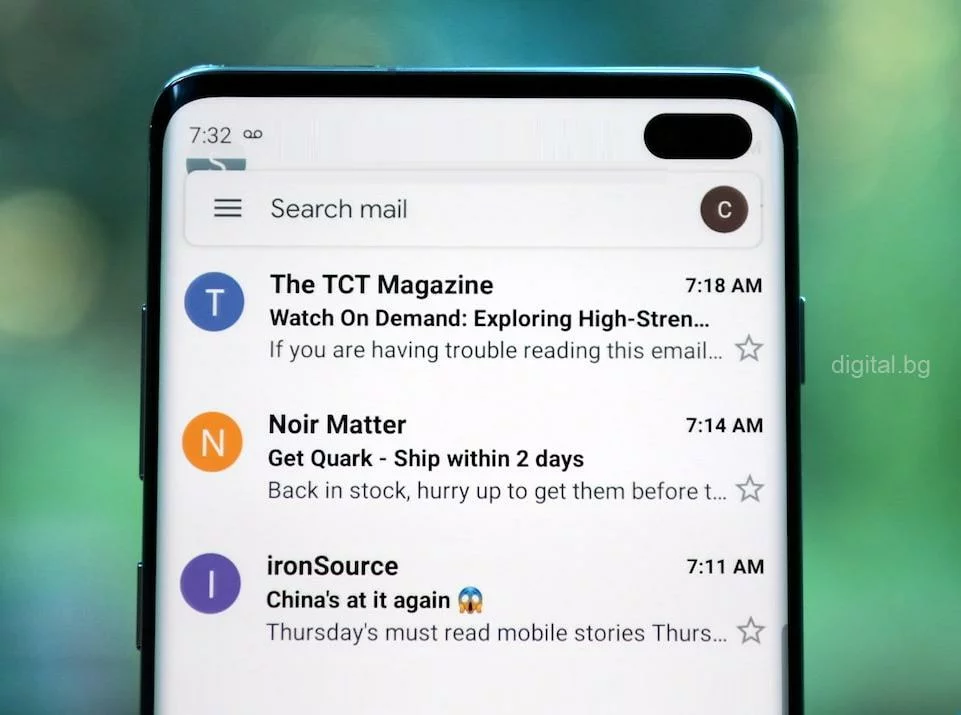
Over 70% of emails get opened on phones. If yours looks broken on mobile, you’ve already lost.
Poorly formatted mobile emails bounce fast. Spam filters notice high bounce rates and start flagging your messages.
Here’s how to create emails that work on every screen:
Use responsive design
Responsive design adjusts your email layout for any device automatically. Make sure you have:
- Scalable fonts
- Flexible grid layouts
- Images that resize properly
If you’re not using responsive templates, you’re missing most of your audience.
Keep subject lines short & sweet.
Mobile screens show fewer characters than desktops, which is why long subject lines get cut off. Make sure that you:
- Keep subject lines under 45 characters
- Use preheader text for extra context
- Put important words first
Don’t design for a gorilla’s thumbs
People tap with thumbs, not click with mice, which is why your buttons need to work for fingers. And when I say fingers, that means all kinds of them. Make buttons:
- At least 44 pixels tall
- Easy to tap without hitting other links
- Surrounded by white space
Hard-to-tap buttons cause misclicks or kill conversions.
Test on real devices
Your email might look perfect on desktop and terrible on phones, so always test before sending. You can use tools like:
- Litmus
- Mailtrap
- Email on Acid
These show how your emails look across different devices and email apps.
Write for scanners
People scan emails on mobile, which is why long paragraphs make them scroll away. These might work only if you have a cult audience:
Keep it simple:
- Use paragraphs no longer than 2-3 lines
- Make your call-to-action buttons stand out
- Put your main request near the top
You’ve got to make every word count, and that can’t happen if people don’t find them easy to read.
Tip 7: Reduce the size and number of attachments
A close circle is always good for you, which is why too many attachments hurt. I’m kidding. Attachments seem convenient for sharing files, but spam filters see them as threats.
Large or multiple attachments are why many tip-top emails land in spam folders.
Spam filters link attachments to:
- Phishing scams
- Malware distribution
- Mass marketing abuse
Even innocent PDFs can get flagged if:
- The size exceeds 1-2MB
- The file type is blocked (.exe, .zip, .xlsm)
- You include multiple files in one email
What do we do then? Here are some ways you can share attachments without triggering spam filters:
Use cloud storage instead


Instead of attaching files, you can upload them to cloud storage and share a link. You can use:
- Google Drive
- OneDrive
- Dropbox
- Box
Then include a clear link in your email. So instead of doing “Attached is our pitch deck”, you can do “Click here to view our pitch deck on Google Drive.”
That way, you can track clicks, update files without resending, and emails load faster.
Keep emails lightweight
Heavy emails load slowly on mobile, and poor connections hurt engagement and deliverability. You must never forget to:
- Compress all images
- Use simple HTML formatting
- Limit animations and fancy CSS
- Keep total email size under 100KB
Fast-loading emails perform better in every way.
When you must attach files
Sometimes you need to attach something. If you must:
- Keep files under 1MB
- Use safe formats (.pdf, .docx)
- Make sure it fits the email context
- Mention the attachment in your message
- Never send surprise attachments to new contacts
Spam filters assume the worst, so be transparent and professional with any attachments.
Tip 8: Keep a clean IP address
Your sending IP address is your digital reputation, and a bad history means blocked emails.
If your IP has spam complaints or blacklist entries, inbox providers will reject your messages before anyone sees them.
Here’s how to maintain a spotless sending reputation.
Check for blacklists
Your emails might be getting blocked without you knowing it. Use these tools to check your IP status:
- MXToolbox
- Spamhaus
- MultiRBL
If your IP appears on any blacklist, fix it immediately. You can also set up alerts to monitor your status ongoing.
To track your email performance and test whether your emails are landing in the inbox or spam, use our email deliverability test. This tool provides insights into how your emails are performing with major email providers.
Monitor your bounce rate.
Hard bounces happen when you send to invalid email addresses. These could prove to be deadly for your domain. So keep your list clean by:
- Using an email validation API
- Validating emails before major sends
- Removing inactive addresses regularly
High bounce rates signal poor list hygiene to spam filters.
Tip 9: Configure deliverability settings for Salesforce
Even with perfectly crafted copy and spotless email lists, your Salesforce email deliverability depends on a handful of critical settings buried deep within your configuration panel.
Access to send email is set to “All Email.”
This controls which emails Salesforce can send for you.
If it’s set to “System Email Only,” you’re blocking yourself, and your marketing emails, sales sequences, and campaign messages won’t send at all.
- Go to: Setup > Email > Deliverability
- Select: All Email from the dropdown
This allows you to use all of Salesforce’s email capabilities.
Turn on bounce management
This stops Salesforce from sending to dead email addresses over and over. Without bounce management, you keep hitting invalid addresses. Spam filters see this pattern and assume you’re sloppy or fake.
When bounce management is active, Salesforce automatically:
- Stops future email attempts to those addresses
- Maintains a suppression list of problematic addresses
- Protects your sender reputation from unnecessary damage
- Tracks which email addresses return hard bounces (permanent failures)
This setting helps preserve both your domain reputation and IP address standing with major email providers.
Enable encryption on TLS settings.
Unencrypted emails often get flagged as outdated or risky, and even clean content can trigger spam filters. Make sure TLS is:
- Enabled for all outbound messages
- Set to “Required” if your server supports it
- Consistently applied to every email type
Modern email providers expect encryption as a basic security measure.
Enable authentication headers
Here are two checkboxes that prove your emails are legitimate. Without these, you’re sending anonymous emails, and email providers don’t trust anonymous senders.
1. Enable compliance with standard email security mechanisms
This adds standardized authentication headers that prove your emails originated from authorized servers
2. Enable Sender ID compliance
This includes specific sender verification data that helps email providers confirm you’re not impersonating another domain
Add email security mechanisms
This setting adds security credentials to every email automatically. When enabled, it:
- Reduces “spoofed sender” flags
- Meets modern security standards
- Builds consistent trust with email providers
- Includes SPF and DKIM signatures in email headers
Skip this, and your emails lack the credentials that spam filters expect to see.
Stop Salesforce emails from going to spam with Email Warmup
Email Warmup builds your sender reputation before you send real campaigns by gradually introducing your account to email providers.
It simulates natural engagement with your emails:
- Clicks on links naturally
- Generates authentic replies
- Opens and stars your messages
- Builds trust with major email providers
After 2-4 weeks with Email Warmup, your campaigns land in inboxes instead of spam folders.
Ready to guarantee your email deliverability? Try Email Warmup today.
Frequently asked questions on Salesforce going to spam
Here are some FAQs related to this topic:
Why are emails sent from Salesforce going to spam?
Because they often lack proper authentication (like SPF/DKIM) and don’t send through your domain. Spam filters see them as impersonators.
How do I stop spam leads in Salesforce?
Use reCAPTCHA, field validation, and email verification tools to block bots and bad actors at the form level.
Why is everything going to my spam?
It’s likely your sender reputation is shot. Run a deliverability test and check your domain/IP against blacklists. You may need to warm up again.
Why are my outgoing emails suddenly going to spam?
Something changed (could be a new domain, increased volume, bad content, or complaints). Check bounce rates, test your email, and look under the hood of recent campaigns.